One of my favorite things to do is save money. One of my other favorite things to do is save time. One of my other other favorite things to do is not waste food. An easy way that I can do all three is to utilize my freezer by meal prepping and shopping the sales. But how do I keep it as fresh tasting when I take it out as when I put it in? How to prevent freezer burn is question I get a lot when I talk about popping my leftovers in the freezer and it’s a good one. Avoiding those white ice crystals isn’t always an easy feat but it’s not impossible either.
What is Freezer Burn:
First, let’s talk about what freezer burn actually is. Freezer burn is what happens when food is stored incorrectly or stored too long. The food becomes dehydrated as water is being pulled out of the food and turns to ice crystals on the surface. Which makes you do a loud groan when you go to take that frozen casserole out right before you’re going to eat it for dinner, right?
Freezer burn isn’t harmful to you. You won’t get sick from it. But your frozen meals, veggies and meat won’t taste as good as they should either. Food may become tasteless or have a metallic flavor. Meat may be discolored and cook unevenly due to the dry pockets that were created by the dehydration process.
Benefits of Freezing Food:
As mentioned, freezing food allows me to save time, money and reduce food waste. I save myself hours by freezing uncooked one pot meals that I can just throw into a slow cooker or leftovers from a meal prep that just need to be heated up. It’s seriously a lifesaver to have meals in the freezer that I can grab on my way out the door to work. By the time I’m ready to eat them, they’re defrosted and ready to be microwaved. I also keep precooked soups, taco meat, egg muffins, meatballs, smoothies, casseroles and more in single portion servings for easy and quick meals.
Making double batches of meals and freezing the second one is also a huge time saver. It takes almost no extra time to make 2 casseroles, 2 pounds of taco meat, 2 batches of meatballs or 2 spaghetti squashes than it does 1. So basically, cooking two spaghetti squashes and freezing the “spaghetti” strands saves me 50% of my time.
I love getting a good deal on meat so when it’s on sale or I have a coupon (or both!) I stock up. This saves me money in the long run. It also saves me time meal planning and at the grocery store. I usually keep a list in the notes app on my phone of what meat I currently have in the freezer so meal planning is much simpler. And, if I need to whip into the grocery store without meal planning to grab stuff for dinner quickly, I can come up with something on the fly being I know what all I have at home.
Freezing food helps me reduce my food waste (and save money!) because it allows me to throw food that I may not get around to eating before it goes bad into the magical abyss that is the freezer. You can do this with whole foods like raw veggies or with meal prepped meals you can’t eat all of. Sometimes I’ll make way more food on my meal prep days than I can eat so I make sure to store them in the freezer instead of tossing them out once they’re no longer edible.
The average American household throws away $640 of food each year. Food is expensive, and healthy food is a luxury these days so I make my best attempt to not throw out anything. If I only have odds and ends left (not enough of one type of veggie to dice up and freeze), I’ll clean out the fridge and make a stir-fry or egg muffins with the random veggies to freeze or smoothie bags with the random fruits. It takes a little foreshadowing on your part to realize a few days before it goes bad that you won’t be eating it, but it’s worth it for all of the food and money you’ll save.
If you’re wondering if you should freeze something: it’s always better to throw it in the freezer and take it out a few days later than to throw it out a few days later and wish you would have put it in the freezer 😉
Now for the good stuff.
Tips for Freezing Food:
Allow food to cool completely –
Putting food into your freezer while it’s still warm will cause freezer burn. The heat still being contained in the food will turn into steam once in the freezer and cause the formation of ice crystals. Even if it’s still a little warm and you think it’s fine, just wait until it’s cooled completely. This is usually the easiest way to reduce freezer burn as most of us don’t do it.
To cool your food down faster, place it in the fridge, separate things like casseroles and soups out into individual portions, or remove things like meatballs and egg muffins from the pan they baked in. Once the food is cooled or at room temperature, go ahead and freeze it. Make sure you don’t leave food out longer than it needs to be so you still maintain the quality and safety.
Use storage containers intended for the freezer –
Another extremely common cause of freezer burn is using the wrong storage containers or bags. Skimping on quality to save a few cents seems like a good idea at the time… Until you’re throwing out food that costs way more than what you saved on bags. Food storage containers and bags should be clearly marked “freezer”. If you’re worried something with liquid may spill or be more subject to freezer burn because you cant get the air out, double bag it. You can usually save the outside bag after you’ve used it, so you’re not wasting any extra money.
 For freezer bags I generally just go with the Ziploc quart bags and gallon bags (I know you can get these at any old store but as of the date of this post, there’s a 20% off coupon for both so I figured I’d share). I use freezer bags for tons of stuff from entire one pot meals, diced veggies and separating meat into smaller quantities when I buy in bulk.
I use these freezer containers for soups/chili, bone broths, even just as prep containers with frozen veggies. They work perfectly and the price is even better. I also found this type of Rubbermaid is the best plastic container for freezing foods in. When I was on the hunt to find quality Tupperware, I bought this set at Target for over 20 bucks then saw it on Amazon for $8 and swiftly bought 2 more. They’ve held up for over a year now between freezing, microwaving, storing in the fridge and being in the dishwasher.
I also have an insane amount of Pyrex. They can go from the oven to the freezer or the freezer to the oven to the table without any extra dishes. I use them to prep, store and reheat just about everything. I bring my leftovers and meal prepped meals into work in them, too. If I’ve got a lot of them in the freezer at once, I jot down the contents and the date on a piece of masking tape and stick it on the lid. It comes off really easily if you take it off right when you remove it from the freezer. The rectangle sets are my most used and well loved ones because they’re perfect for cooking varying sized casseroles, baking chicken or salmon, storing roasted veggies in the fridge, etc.
A note about using glass containers: some people will tell you to never, ever freeze glass because if you do the world will explode and all the puppies will die. It’s not that serious, I promise. Just make sure you follow the first rule and allow your food to cool completely before putting it into the freezer after cooking. Like, don’t put a soup that was just simmering on the stove 2 minutes ago into your Pyrex then directly into the freezer. Don’t take a casserole that was baking in your Pyrex out of the oven and right into the freezer. Depending on the food, be mindful of defrosting before cooking or microwaving as well. Do that and we’ll all be fine.
Package your food correctly –
So we covered good storage solutions to prevent freezer burn, but what other steps should you take to make sure none of those ice crystals arrive while your food is waiting for you in the freezer?
Most of the time you’re going to want to package food so it will get as little exposure to air as possible, but for foods containing a lot of liquid, like soup and chili, you’re going to want to leave space at the top of the container for the liquid to expand. The soup containers I mentioned have helpful fill lines to show where to fill it to allow space for the liquid to solidify. If it’s too full it’s going to overflow as it’s freezing, break the seal of your container and make you really, really mad. You can go a step further here to prevent freezer burn and add some plastic wrap or foil over the surface of the soup and then add the lid.
Package food tightly by filling containers or removing air from plastic bags before freezing. Some foods, like the soups, are impossible to do that with. No worries. There’s a few different ways you can still prevent freezer burn. For casseroles, single portion leftovers and anything in a container that doesn’t fill to the top, add a layer of plastic wrap or aluminum foil.
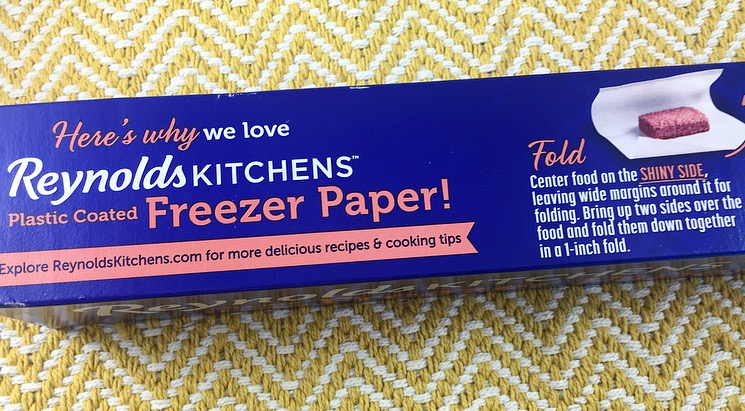
For meat, I highly suggest taking it out of the packaging it comes in instead of just putting it in the freezer. The thin plastic wrap or butcher paper it’s wrapped in will not hold up in the elements, especially if you won’t eat that frozen meat for a while. I separate the raw meat out into pounds or half pound portions. For chicken breasts, I separate them in 2-4 breasts. I wrap them with freezer paper, clearly label them with what each package contains and put in a freezer safe bag. I always go the extra mile to prevent freezer burn with meat being it’s so expensive.
 To prevent freezer burn on other foods that don’t fit tightly into a container or aren’t able to be wrapped, flash freezing is a great option. Usually this works perfectly for odd shaped food, single items and fruits. Flash freezing is super simple. All you need to do is line the food on a tray in a single, spaced out layer, freeze until it’s firm and then store in a better, space-efficient freezer container or bag. Flash freezing is a good solution for foods that need to retain their shape or for buying fresh berries on sale or in bulk. Things like twice baked potatoes, protein balls, baked goods and berries are all able to be flash frozen.
Keep the freezer temperature below freezing –
Freezer burn is more likely to occur if your freezer temperature is fluctuating above freezing. If you’re not sure, get a freezer thermometer to check, and, if it is, store a large ice block in there to keep the temp down. To help with this, make sure you’re not allowing the freezer door to be open for long periods of time. When you unpack groceries, put the freezer items on the counter and put it in all at once instead of leaving the door open while you unload. Another thing that helps your freezer remain at a constant temperature is to keep your freezer at least 3/4’s full. The more that’s frozen in there, the less hard your freezer has to work to keep it frozen.
Raw vegetables need to be blanched before freezing and not all raw vegetables should be frozen, specifically ones with a high water content.
Vegetables that shouldn’t be frozen are: cabbage, leafy greens, peppers, ripe tomatoes, watermelons, cucumber and zucchini
Be mindful of how long you can keep food frozen safely. Ground meats can be frozen and consumed safely up to 3-4 months. Chicken has a freezer life of 6-9 months while fruits and blanched veggies can live in your freezer between 8-12 months.
Write a label on a piece of tape with the date and meal. After a while you’ll forget what’s in there and frozen food often looks the same from the outside of a container. Along that line, organize it with the oldest in the front so you’re ensuring you’re using up the oldest food first and replenishing your stock with the new food.
Freeze single servings of chicken breasts in a marinade. Pour a few tablespoons of your favorite dressing into a baggie, add a chicken breast and take it out when you need a quick protein for a salad.
If you’re buying a rare ingredient you don’t need and wouldn’t use in it’s entirety, this is a good time to make a double batch so you’re getting your money’s worth.
I’ve learned these lessons through the last few years through trial-and-error and now that I’ve pretty much got it down, I hope they can help you save money, time and food! Let me know what your favorite freezer meals are!
This post may contain affiliate links, though the products are ones I frequently use personally and recommend. When you purchase anything using my links, it costs you absolutely nothing extra, but it does give Paleobailey.com a little financial support which helps to keep this blog running. Thank you for your continued support, both with your dollars and your interest.




Stephanie Smith says
Oh my gosh, this is full of such good information!!! ????????
paleobailey says
Thank you so much! Happy it was helpful!!